
 Factom is one of the projects out there that seems to have a bright future… and because of this Factoids (what “Factom coins” are called) may turn out to be a very good investment… which has you asking the question of how to buy Factom coin. In this short post I’ll go over not only how to buy it, but also how to store it and keep it safe if you are going to be keeping it for the long term.
There is a lot of good information out there on Factom, which is why I myself invested in the concurrency a while back. What the team behind this project is doing is truly good. Factom’s goal is to provide secure data storage on the blockchain…. which means safe record keeping. This is a big deal. Imagine having all your records… medical, financial, educational, etc, secured on a blockchain that will never get changed. I guess it could be bad if you don’t want people seeing your records… but overall its a good thing.
The cryptocurrency of Factom, which are called Factoids, are what allow people to enter data on the platform. They are used to secure the data by linking them to the Bitcoin blockchain. I really don’t know the specifics of how this all works but I do know it works and places are adopting this technology… and of course the more people that adopt it and use it means the higher the price of Factoids go.
But anyways… let me get to the point of this articles which will show you how to buy Factoids. These aren’t as easy to buy as Bitcoin, Ethereum, or Litecoin, but the process is still easy to go through. However, the first thing I want to go over is setting up your Factom wallet. This is important if to keep your Factoids safely stored.
Getting Your Factom Wallet Set Up
You can read everything you need to know about setting up your Factom wallet at docs.Factom.com but I’ll go over it briefly.
The first thing you will have to do is download the installer for the official Factom Enterprise wallet from Github. Then you will run the installer and the process of getting that installed is pretty straight forward.
When you first open the wallet you will have the ability to choose a secure encrypted wallet or a not secure unencrypted wallet. Of course the better choice is to choose the secure one and set up a password for it. After going through this it will take a while to actually be usable. The reason is because it has to gather all the new transactions. This could take a while.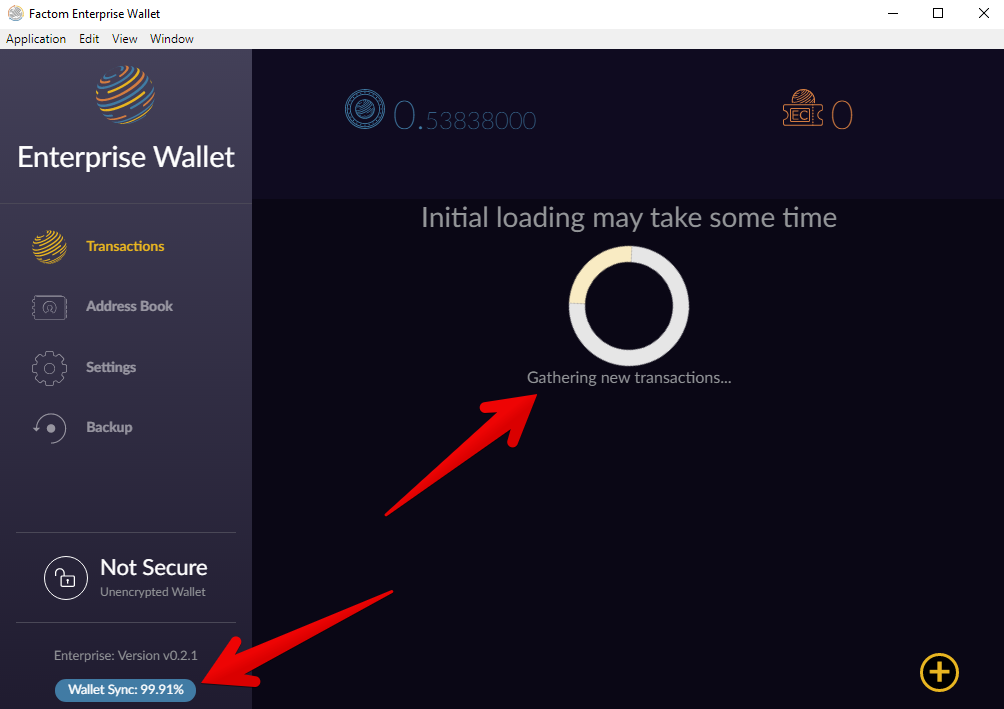
The wallet is pretty simple to use. Its basic but it does the job. You have your Address Book, Settings, Transactions… everything you need.
At the end of this when you go to send your newly bought Factoids to this wallet you will have to click on that + symbol at the bottom right which will allow you to send or receive.
But anyways… now onto the actual buying of Factoids. I suggest that you start getting your wallet set up and then you can start the process of buying Factoids as you are waiting on that to complete.
Buying Factoids
Step 1: You are Going to Need Bitcoin
Yes you will need bitcoin because we are then going to exchange this bitcoin for factoids. So if you have bitcoin you are good to go but if you don’t then you will need to buy some.
Where should you buy Bitcoin? The easiest and safest way to go about it is buying through Coinbase, which is a US based exchange that allows you to purchase bitcoin with your credit/debit card.
The first thing you will have to do is create a Coinbase account which doesn’t take all that long. You can go to Coinbase.com/join to do this.
After that you will have to set up your payment method. To do this go into settings, click on linked accounts and click on link a new account. 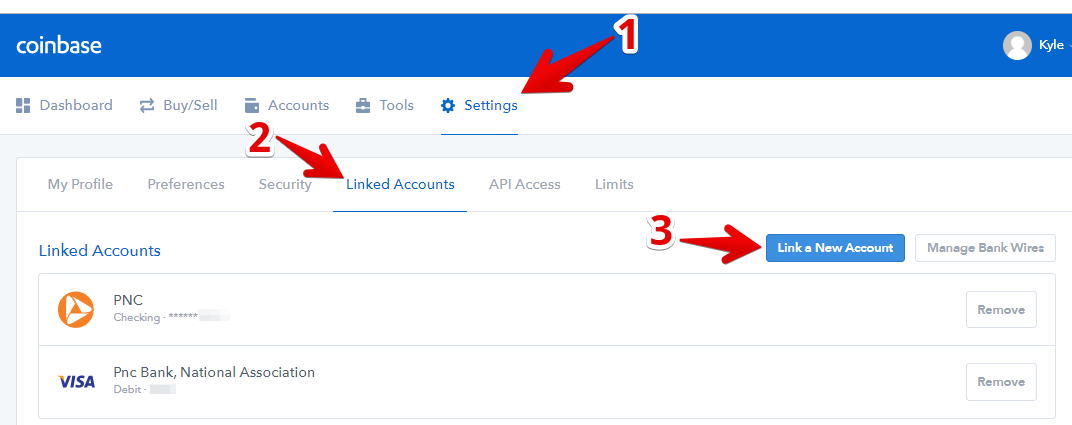
You can link a credit/debit card, a bank account, or you can even set up a wire transfer. Credit/debit cards are the quickest and will allow you to get bitcoin instantly but they also charge higher fees.
After you link an account you will have to go through a short verification process to show ownership over it.
Step 2: Buy Bitcoin
Now that you have your account ready you can purchase bitcoin. Go to buy/sell, click on Bitcoin and enter in how much you want to buy. 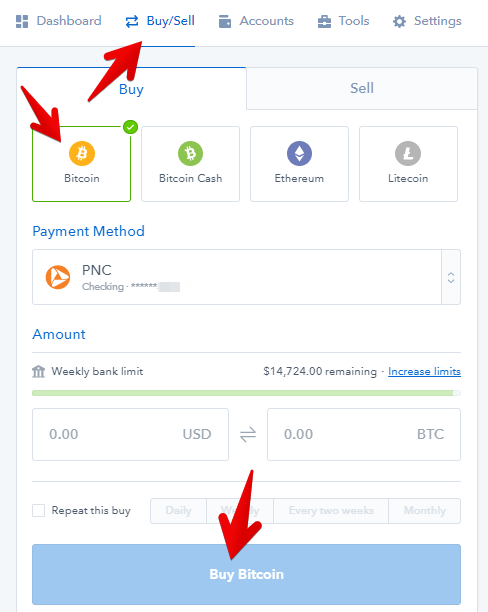
Its pretty simple.
Step 3: Move Bitcoin to an Exchange
Now its time to move your bitcoin over to an exchange. But before you can do this you will have to open up another account on an exchange. I would recommend using Bittrex. There are lots of exchanges out there but Bittrex is a trustworthy one that does have Factom listed.
So you will have to go to Bittrex.com to do this.
After that is all completed its time to deposit your bitcoin, which you will do by going into your wallets, finding your BTC wallet, and getting its address by clicking on the + symbol…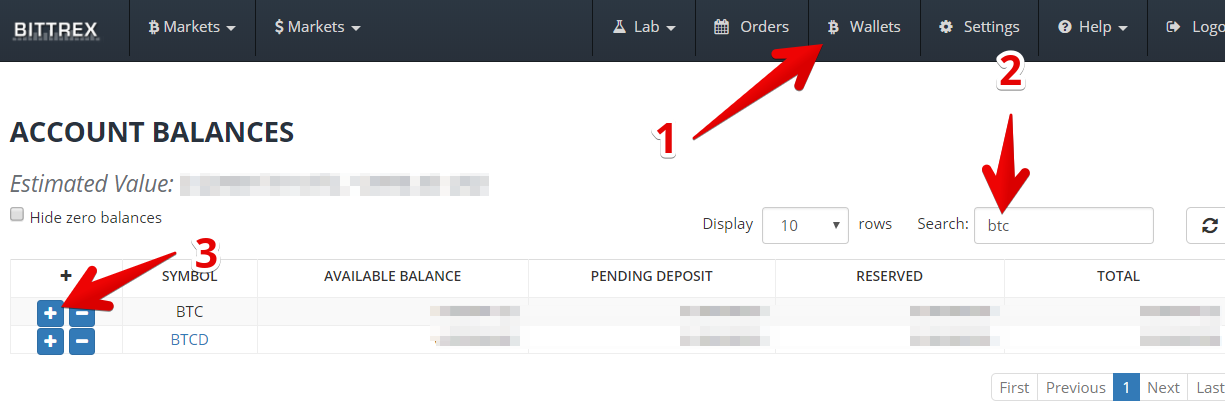
When you click the + symbol your wallet address will pop up which you can copy. Then you will have to head on over to Coinbase. At Coinbase you can send your bitcoin by going to Accounts and clicking on Send below your bitcoin wallet.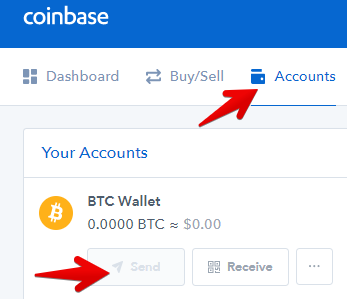
There will be a spot for you to enter in the address you just copied from Bittrex.
Step 4: Exchange Bitcoin for Factom
To do this you will first have to search for FCT (factom) in the bitcoin markets on Bittrex and click on the link that will take you to the trading page.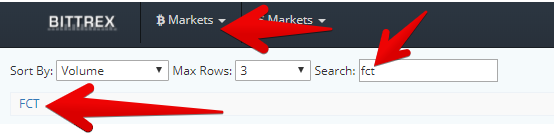
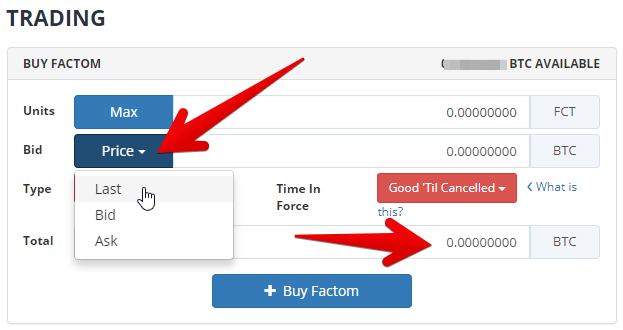
On the trading page you will have to scroll down a bit until you see this area to buy Factom. What you are going to want to do is first set a price that you are going to pay. Its a ration or FCT/BTC. I suggest choosing “Last” because it will just automatically set the price right at where its trading at that point in time, which means your order will get filled right away.
Then below that at the bottom you will enter in the total amount of BTC you are going to spend. The amount of FCT you will get at the top will be filled automatically…
Sending Your Factom to Your Wallet
Now its time to store those Factoids away in your wallet for safe keeping. To do this you will click on the + symbol down in the bottom right corner of the wallet, was I mentioned at the beginning of this post. You will them be able to click on Receive and it will give you your wallet address that you can send the Factoids to.
So now you will have to go to your FCT wallet in Bittrex, just as you did going to your BTC wallet a little bit ago. Just this time click on the – symbol, which will allow you to send your funds to another destination, in this case send your factoids to your wallet. Just paste in your wallet address, enter how much you want to send and you are good to go.
I would advise sending a very small amount for the first transaction just to make sure everything goes through. You will have to likely wait a bit for the factom to end up in your wallet even if everything is working properly.
Summary of Everything
- Set Up Your Factom Enterprise Wallet
- Buy Bitcoins from Coinbase if you haven’t got any (you can use my referral link here Coinbase.com/join to get $10 of BTC free in your account)
- Move bitcoin to Bittrex & exchange it for Factom
- Move Factom to wallet
If you have any questions or comments about this process let me know in the comment section below. I’ll get back to you soon on anything.
My Make Money Online Guide

0 comments